The back story…
I live in a community that does not have street lights. One of the mandates of our homeowner’s association is that we have a pole mounted light source on our property. The original intent as per the association guidelines is that this post mounted light would be somewhere in the front yard adjacent to the intersection of the driveway and the sidewalk – hence, illuminating the common sidewalk and providing path lighting in the community. In practice, many homes actually have these installed closer to their approach walk than the common sidewalk, nonetheless, they are a required element for each home in our neighborhood, and proper operation is enforced by our HOA.
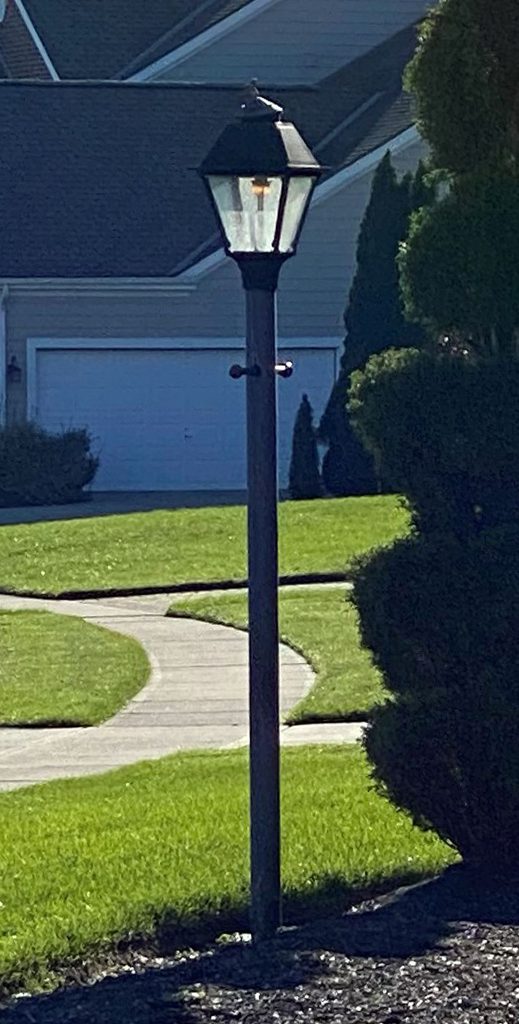
For a large number of the homes in my community, these post mounted lights take the form of a natural gas powered, mantle based lantern similar to the propane variants used for camping. When I bought the home I wondered why I would ever want a pole mounted lantern that just burned gas all day? My home was built in 2002 – it’s not ancient, why use gas for this purpose? Not only did it seem antiquated, it seemed to be the exact opposite of economical. A gas lantern just runs all the time. There is no ignition system other than a match or a lighter — it doesn’t know the concept of dusk to dawn. The only benefit that I saw was that they would function properly even in a complete power outage in the neighborhood, so perhaps that was the initial draw to Natural Gas for this purpose.
Despite “enforcement” by our association, on one of the first walks around my neighborhood, I noticed that some homes had a distinct natural gas smell as I walked past them. Almost every such case revealed that the homeowner had neglected to replace old worn out mantles and the fixtures were just blowing gas into the atmosphere. Not only were they not providing light, they were truly wasting resources. I had noticed on this same walk that natural gas wasn’t universal in the neighborhood – so there are obviously other options for the lamp in my own yard.
Curiosity piqued….
My walk made me contemplate conversion. Some homes in the neighborhood had traditional post mounted electric lamp heads utilizing automatic eyes and incandescent or LED bulbs. Most of these appeared to be installed at the time when the home was built. I saw a few that were obviously conversions – because they were the same exact model lamp head that I had but had bulbs (usually low voltage landscape lighting types) hanging where the mantles once did.
I found this to be an intriguing option. In order to convert the light to electric, I’d need to trench a wire from an area on my home adjacent to the electrical panel all the way out to the post. In my case, this would easily be 200’ of wire. I would then need to find a safe way to feed the wire up into the existing post and into a new lamp head. A quick google search revealed many companies that sell gas to low voltage electric conversion kits – designed to pop right into place where the natural gas assemblies reside. All of this is possible for a competent DIY’er like myself, however, my current electrical panel is completely full – which means I would either need to install a subpanel or piggyback off of some other breaker to feed a wire out to the front yard. Neither were options I wanted to tackle just for the purpose of updating this lantern. On top of that, if the draw to natural gas was based on the ability to provide light during a power outage, electric really isn’t a solution (unless you have a whole-house generator).
Given that it’s 2020 and battery and solar technology are reaching increasingly impressive levels of viability for this purpose, I started to research solar lamp heads for post installation. I imagined that if I could find something that had sufficient brightness, battery and charging capability, and could provide true dusk to dawn operation, it would be a no brainer. Replacing my post lamp would then be a simple 1-2 hour job consisting of turning off the gas to the existing lamp at the manifold in my basement, removing the old lamp head from the post, disconnecting and the gas line from the lamp head and then capping it, painting the post (optional, but, why not?), and then simply putting the new solar lamp head on the post and turning it on. There would be no wiring, no breakers, no trenching and I would have a self powered lamp that isn’t reliant on electrical supply should there be a power outage – sounded great!
The bottom line…
Would it be cost efficient? Solar units aren’t completely maintenance free. Solar lights contain batteries that store the energy collected from the solar panels to power the bulb(s) through the night. I’ve seen some solar lights that don’t contain user replaceable batteries and some that do. For the ones that don’t, you’ll be in the business of replacing the entire lamp head when the batteries are shot. For those that do, you’ll need to replace batteries every couple years when they lose their capacity to sufficiently power the lamp from dusk to dawn or simply stop working. Either way, there are costs and maintenance involved – and it varies from a couple bucks a year to $150 or more every few years.
Keep in mind, gas lanterns aren’t maintenance free either. In my own experience, the extremely fragile mantles are susceptible to unintended damage that shortens their life. In a perfect world you could probably get 12 months of usage out of a new set of mantles. In my personal experience, I replaced them about every 9 months on average. I had one time where I bumped the post with my lawnmower (and not even very hard) and the vibration caused one of the mantles to collapse and fall into the lamp head. I had one other time where a wind storm allowed enough wind into the lamp head to cause a mantle to fail. Once the mantles have been broken in and are burning – they are like the thinnest mesh porcelain cup you could imagine… you see this when you replace them – they basically disintegrate when you touch them. New mantles are about $10 a pair for my particular model lamp.
Now the real question was – given what I’ve mentioned above, would purchasing a solar lamp and maintaining it over the course of it’s life be more cost efficient than maintaining my current gas lamp over the same period of time. For solar, this would mean determining the expected life of the unit versus the consumable components (batteries) – and then calculating the cost of the unit plus the maintenance over the expected life. For the gas lamp, it would mean figuring out exactly what it costs me each month in natural gas expense over the same period of time, while including the cost of mantle replacements on an average nine month cadence.
Doing the math on the natural gas unit shocked me. The unit I have burns about 2200 BTU/hour. Extrapolate over a 30 day month and that’s almost 1.6 million BTU (1,584,000 to be exact). My natural gas is charged in Ccf, which is BTU divided by 100,000 – so 15.84 Ccf. At an average cost of around $0.48 per Ccf plus tax – it means my gas lamp adds about $8.14 per month to my natural gas bill. Mantles cost around $10.00 when they’re cheap on Amazon – replaced on average every 9 months.
Solar – the research begins…
Doing the same cost analysis on a solar unit would first involve finding a solar unit to buy. My research on solar lamp heads led me to a company called Gama Sonic. My local big box hardware store carried a solar post light from this company called “The Imperial”, but I didn’t feel it’s 180 lumen output would be sufficient enough to replace my dual mantle gas lamp. The design was exactly what I was looking for because it looked almost identical to the gas lamp I wanted to replace, especially important in a HOA governed neighborhood, so I decided to check their website to see what other products they offered. It turns out they offer all kinds of solar lamps.
One called the Imperial II caught my eye. The lumen output was rated at 300 – which would be a sufficient amount of light for this purpose. It had user replaceable batteries which was also a big plus — the only problem was that it was only offered in daylight color temperature, which would certainly stick out in a neighborhood full of gas lanterns that have a warm color temperature.
I kept looking through their products and stumbled upon another unit called the Imperial III. The Imperial III had the same 300 lumen output as the Imperial II, but it had user selectable color temperature between warm and bright. The rest of the specs seemed to be almost identical to the Imperial II. This could be the ticket, but I didn’t see it for sale online anywhere so I reached out to the company directly and much to my delight, I was promptly contacted by a gentleman named Matt Cohen, a commercial sales director for the Georgia based company.
Matt was able to fill in a lot of the blanks for the questions I had and provide the statistics I’d need to actually perform a cost comparison against my current setup. The Imperial III has an expected life of 10 years. It contains four two-cell 3.2V 3000mAh lithium ion batteries that must be replaced every 2-3 years at a cost of around $100 total. Not only is there a selector switch for color temperature, there is another for selecting either low power or high power mode. Low power mode is, of course, dimmer than high – but it allows for about 72 hours of light. High power mode allows for about 36 hours. So even in the longest nights of the year (12 hours) – you can get 3-6 evenings of dusk to dawn light even if the days are so dreary that the sun doesn’t fully recharge the battery packs. The battery packs have a total capacity of 12,000 mAh, and in full sun, the solar panels can provide about 8W of charging current. On a bright, sunny day, the solar panels will fully recharge the battery packs during the daytime hours – especially if the only thing they’re doing is recovering from the previous night’s usage. From my own research, 8W of solar power can provide 1.6A of charging current at 5V and 2.5A of charging current at 3.2V – ample current to refresh the batteries in 5-8 hours (depending on the operating voltage within the charging circuits). Of course… this relies on full sun on all of the panels – so your mileage may vary – overcast days won’t provide as much charging current – but the system capacity is ample enough.
Cost comparison…
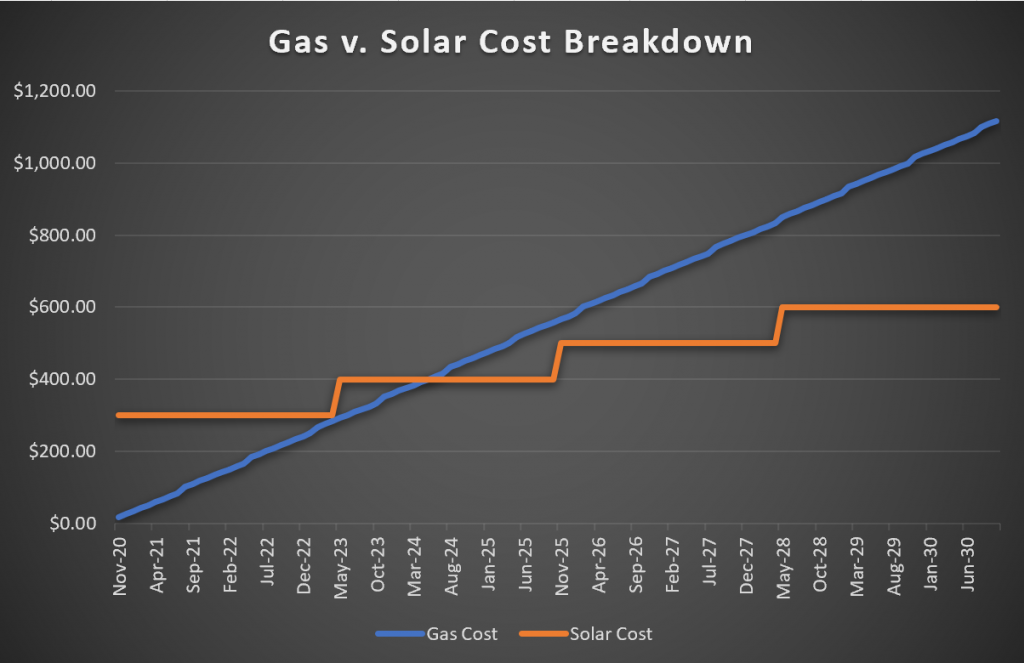
Armed with this information, I decided to calculate the cost over the expected life of the unit. For solar, it’s simple. The lamp costs $300 and lasts 10 years. The batteries need to be replaced every 2-3 years, so if I assume that means I’ll replace them every 2.5 years, then I will replace them at the 2.5, 5, and 7.5 year mark – for a total of $300 (assuming the prices remain constant). Given these facts, the total operating cost over the 10 year life for the solar unit will be $600.
Now, compare that to the gas unit numbers I mentioned previously over the same 10 year period. If I leave well enough alone, I would spend $8.14 per month ($976.80) in natural gas plus $10 every 9 months for mantle replacement ($140). Add those together and round up, and the total cost for the gas unit would be $1,117.00. This, of course, considers that natural gas prices don’t increase and the mantles remain available at the same cost. Regardless, over the course of 10 years, I will burn zero natural gas and save at least $517.00 by switching to solar. For those of you that are into visuals, this 10 year breakdown is illustrated in the chart below.
The decision…
I pulled the trigger. The Imperial III is listed as suitable for both commercial and residential use. The full retail cost of the lamp is $339 on Gama Sonic’s website, but by ordering through Matt directly I was able to get the lamp for $300. Now all I had to do was wait for UPS to drop the unit at my door.
First Impression…
The unit arrived in 3 days via UPS ground to my address in Ohio from Georgia. It was thoughtfully packaged in a thick cardboard box with a Styrofoam insert.
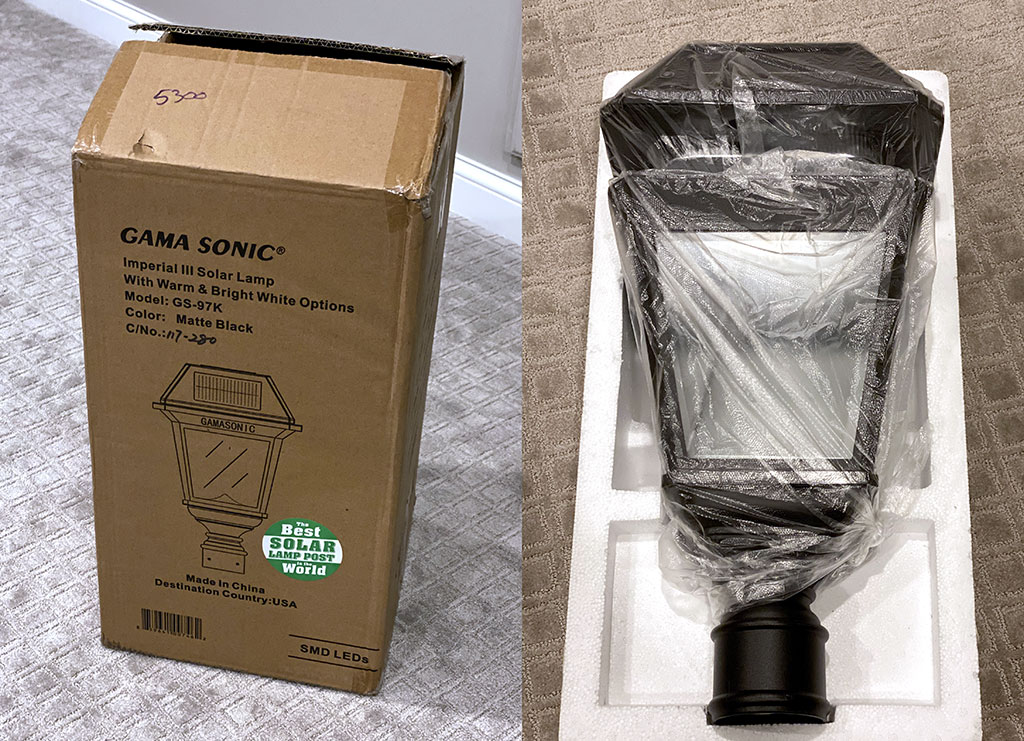
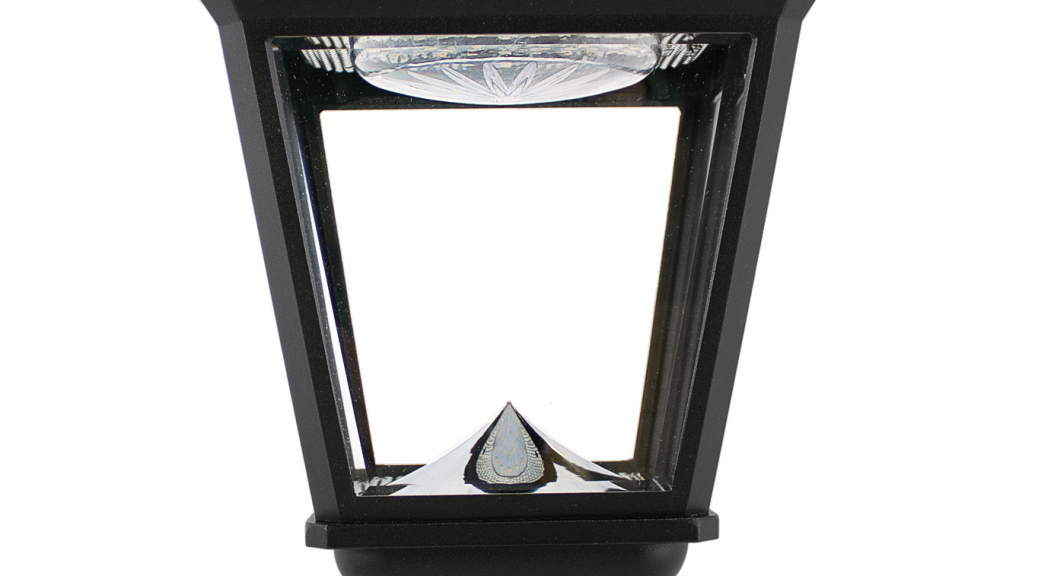
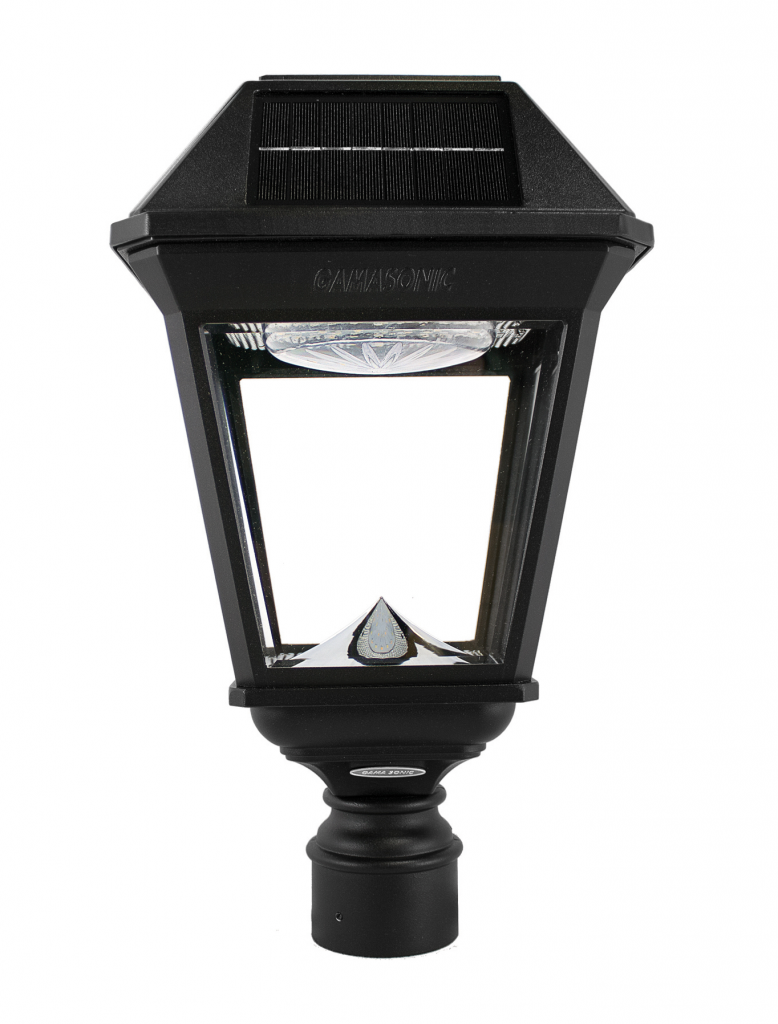
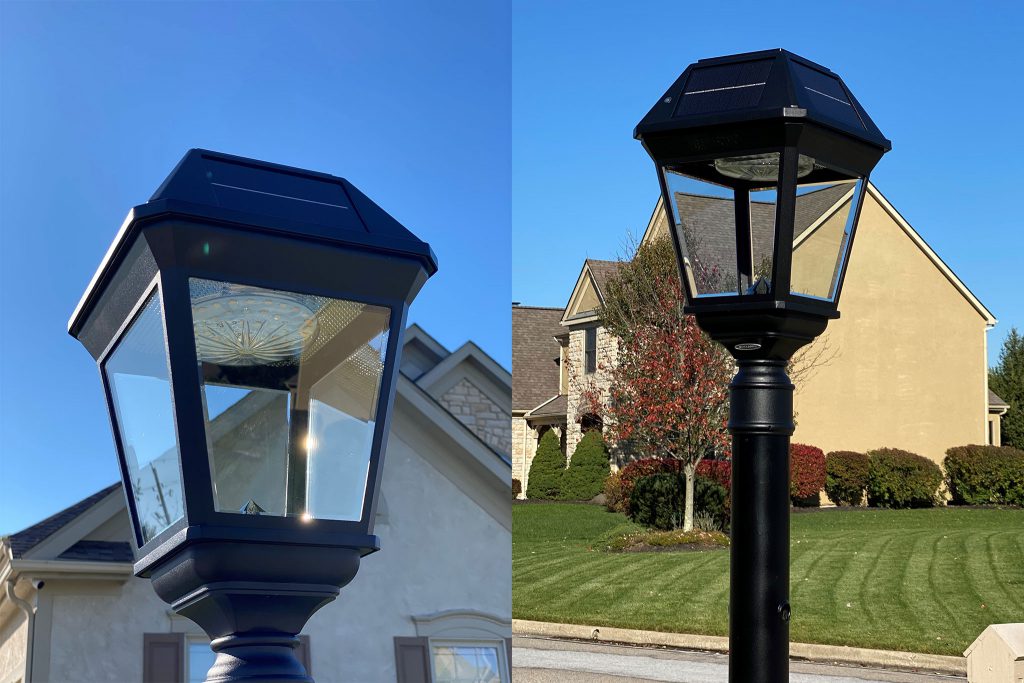
Once I took the unit out I was impressed. It looked very nice… clean, simple. It looked almost identical to my existing gas light other than the fact that the top contained five solar panels (one on each face and one on the top) and was missing the Eagle Ornament that adorns the top of my gas fixture. The major components of the lamp head are made of aluminum. It contains a glass panel on each side of the base that is not removeable, and the top of the fixture can easily be removed. The top portion also contains the main lamp element, four batteries, and all of the electronics.
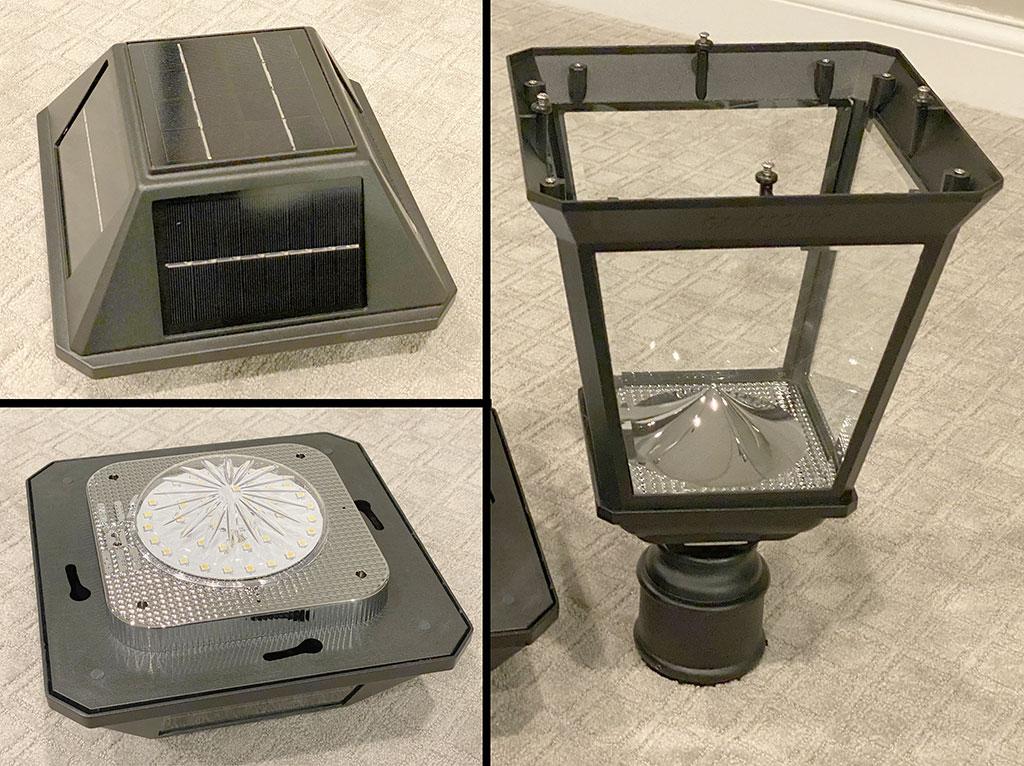
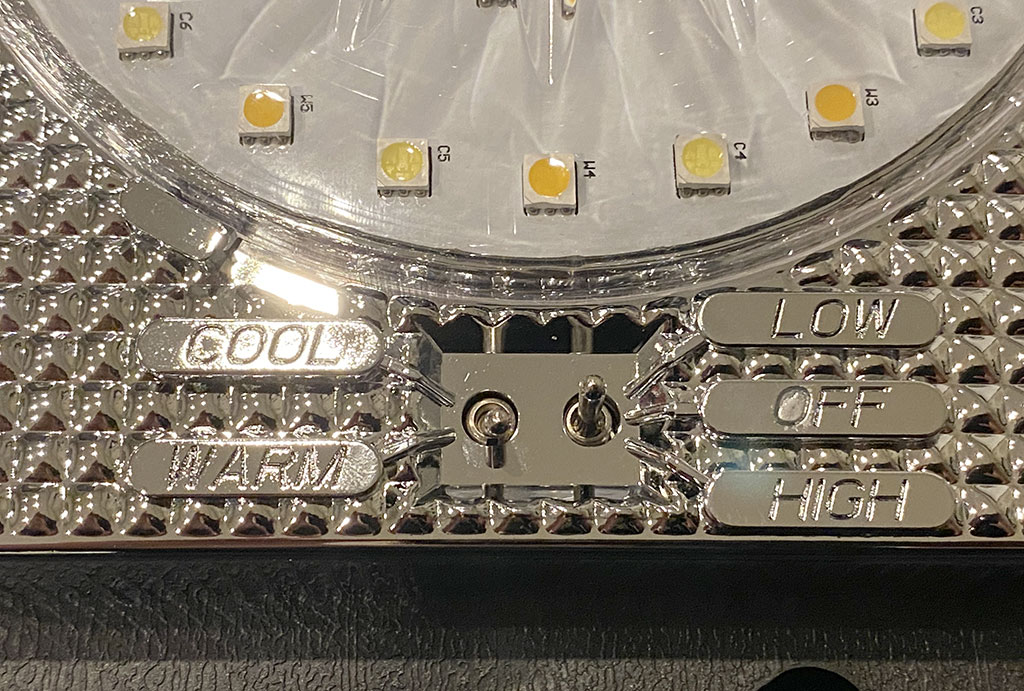
Bottom left – View of the underside of the top of the unit including the lamp assembly and configuration/power switches.
Right – The botton of the unit complete with 3″ pole mount.
Knowing that it used Lithium Ion batteries, I knew it would have some charge from the factory – so I took it in to the darkest room in my house, the basement, and flipped the switch. I’ve seen solar lamps before, and I’m usually disappointed in their light output – but even on low, this one was quite good. The switch to flip between cool and warm color temperature was a neat touch, although I knew mine would stay in the “warm” setting to blend better with the existing gas lights in my neighborhood.
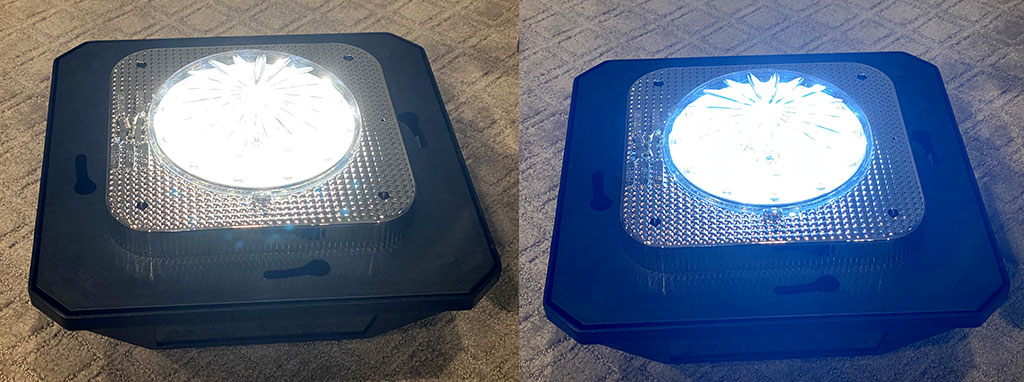
Right: Lamp on Low setting with Cool Color Temperature
*NOTE – Neither of these pictures is perfectly representative of the actual color temperature from the light due to limitations in my camera AND my photo editing skills. The warm setting looks very close to the output from a standard incandescent bulb or gas fixture. The cool setting is certainly bright, but it has the blue tint common in daylight LED bulbs.
When completely assembled and placed at an appropriate height (around 5-6 feet from the ground) this lamp throws a very nice circle of light on the ground that extends out many feet. There is a super shiny reflector in the bottom of the lamp fixture that is shaped to reflect light up and out of the four glass panels that wrap around the unit – and it also creates a reflection of the top-mounted light fixture that gives you the illusion that the lamp is full of lights – so much so that it’s output seems higher than the 300 lumen number suggests. It also bounces light reflected from the bottom back down from the the top as the area around the lamp itself is yet another reflective surface. All in all – it seemed very promising as a replacement for my gas lamp.
Installation day…
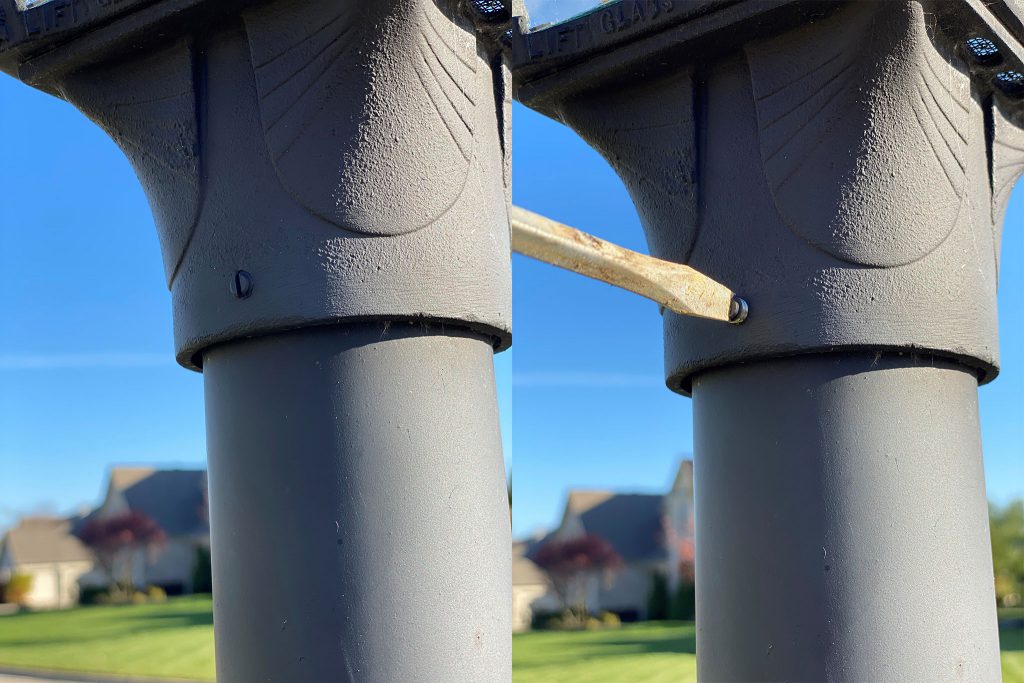
I’m an impatient guy… so when UPS notified me that a package was out for delivery, I went outside and turned the gas off on my existing fixture using a screwdriver on the shut-off valve. I had also gone down to the natural gas manifold in my basement and turned off the valve on the line that supplied the fixture. Of course, I did this because you’re literally playing with fire. These lamps run hot – the lamp head itself and the four panes of glass are all in close proximity to a constant flame. I figured by turning the gas off early, when the Imperial III arrived, the existing lamp would be cool to the touch and ready to be removed.
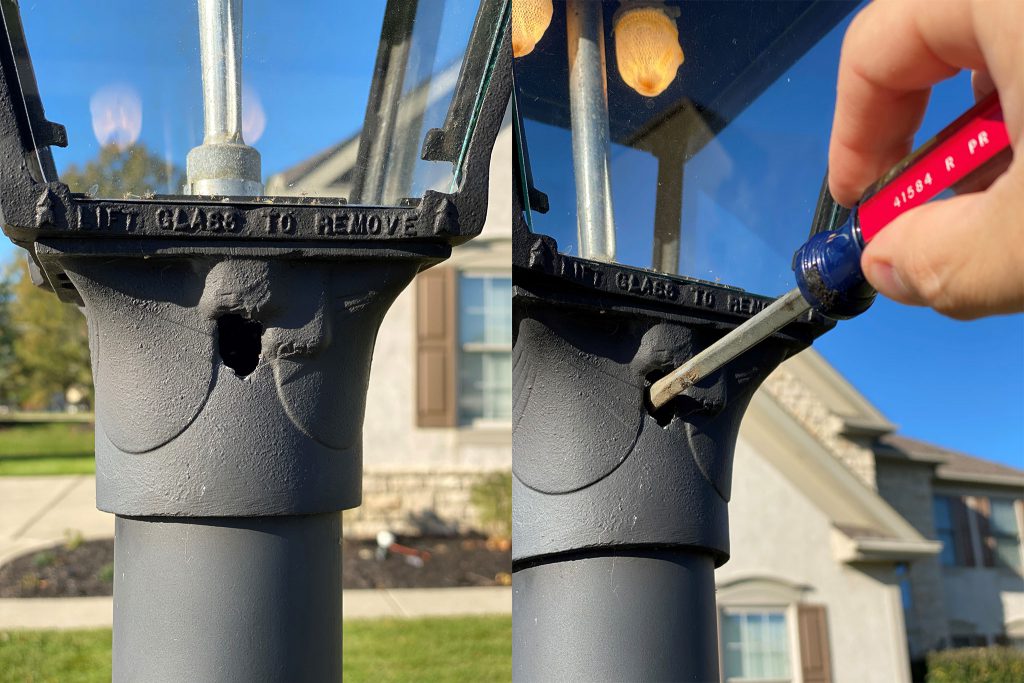
Removing the existing fixture was quite easy. The lamp basically slides over the top of the post and there is a single set screw that is tightened into place to keep the lamp from twisting or otherwise moving once installed. I loosened that and assumed that after 18 years on that post it was going to be a real pain to remove, especially since it was obviously repainted at some point. I removed all four panes of glass so that I would have an easy way to grab on to the lamp and attempt to slightly twist it on the post to ensure that it was loose. To my surprise, it was.
All I had to do was lift it off. In my case, the gas line (which is ¼” copper pipe) was coiled within the post like a spring. I’m sure this is pretty standard practice, because it allows you enough flexibiity to service the flare connection at the bottom of the lamp head once you lift it off of the post, and the coil can easily compress when you install the lamp head on to the post. I lifted the lamp head until it was clear of the post (the last inch or so required some elbow grease) and once it was off, I pulled my wrench out of my pocket and worked the gas connection loose. Loosening the connection took a little patience. The connector is recessed up into the base of the lamp and it has had 18 years to kind of weld itself into place. Getting a wrench to grab at an odd angle and also trying to hold the entire assembly while standing on a ladder would probably have been easier with an extra set of hands, but I managed 😊
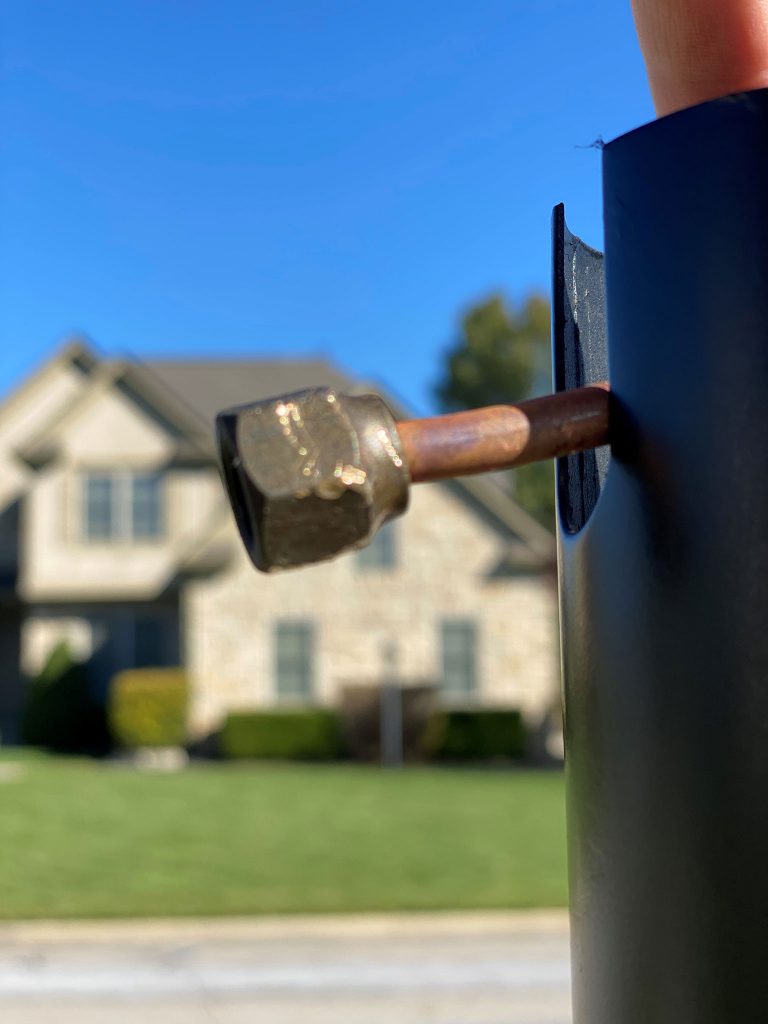
Now that I saw that the connection was a simple ¼” flare nut, I could take a trip to the local hardware store to get something to cap it off. Since this is a flare connection, the best thing to get is a flare union and a flare cap. They do sell “plugs” – but they don’t have the typical flare shape on the threaded side so they don’t apply sufficient pressure to seal the fitting to the supply tube. The union has a flare on both sides and will ensure that you have a nice tight seal on the existing fitting and the ¼” supply line and the cap will ensure it doesn’t leak
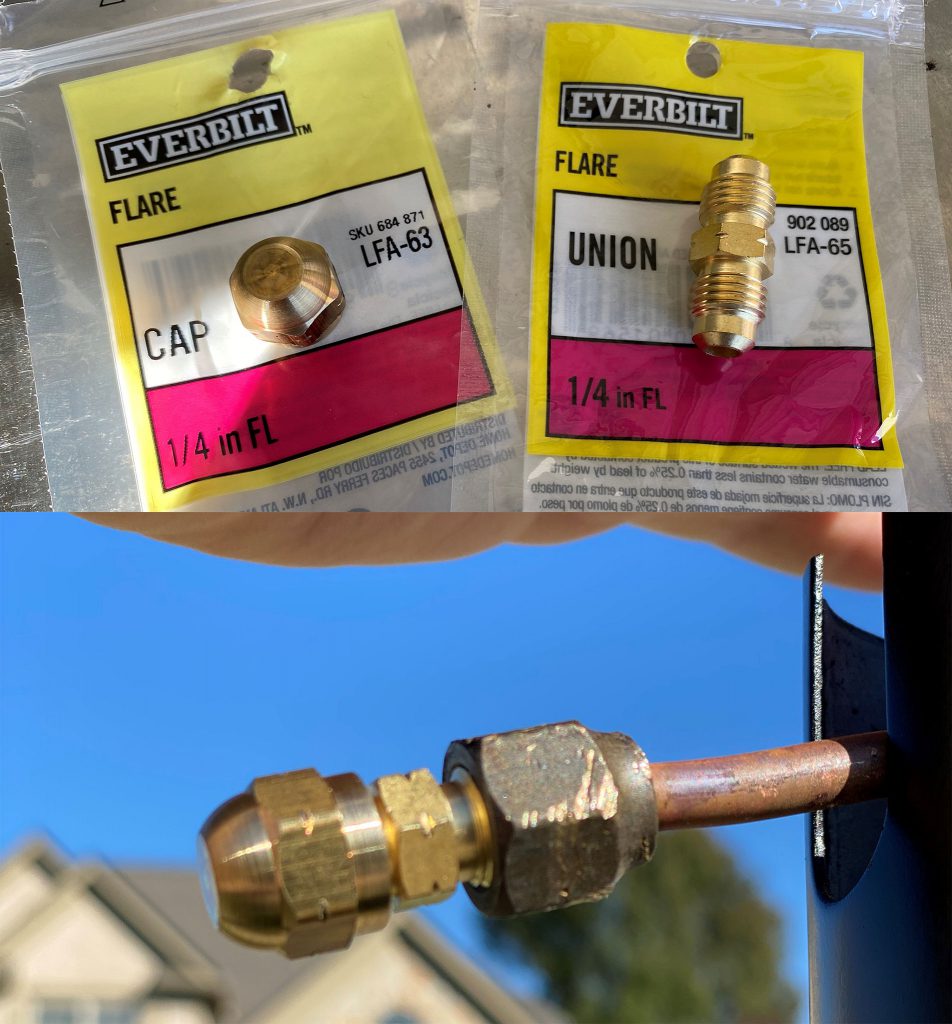
BOTTOM: The finished capped line.
I put the male union into the existing female flare fitting and tightened it down, and then added the flare cap to the union to seal it off. This way, if someone ever inadvertently turns on the valve on the manifold in my basement, it doesn’t matter – the line itself is capped off at the post so no gas will escape. I pushed the entire assembly back down into the post just far enough that it wouldn’t get in the way of the new fixture.
While I was at the hardware store, I decided this would also be a good opportunity to pick up some satin black spray paint to touch up the post. I used some relatively fine grit sandpaper to sand down any areas of my post that were chipped, scuffed, or just didn’t look nice. I got a clean wet rag and wiped off all of the sanding dust on the post and then allowed it to dry in the sun. I repainted the entire post and waited 45 minutes or so for it to dry to the touch. The gas line was now capped and the post was ready to receive the new lamp.
Fitting the unit to the post…
My existing post is a standard 3” diameter lamp post – exactly what is recommended for the Imperial III unit. I lifted the base of the Imperial III fixture on to the post and noticed that it fit, but it was quite tight. Looking at the depth of the base for the fixture, it looked like the lamp should easily slide down on to the post a couple of inches, but at about the 1” mark I was meeting resistance. I was quite sure I could force it on to the post, but should I ever need to remove it, I knew it would likely be a challenge – especially given that the glass in the Imperial III is not removeable and there wouldn’t be a great place to push or pull hard enough to remove it without risking damage.
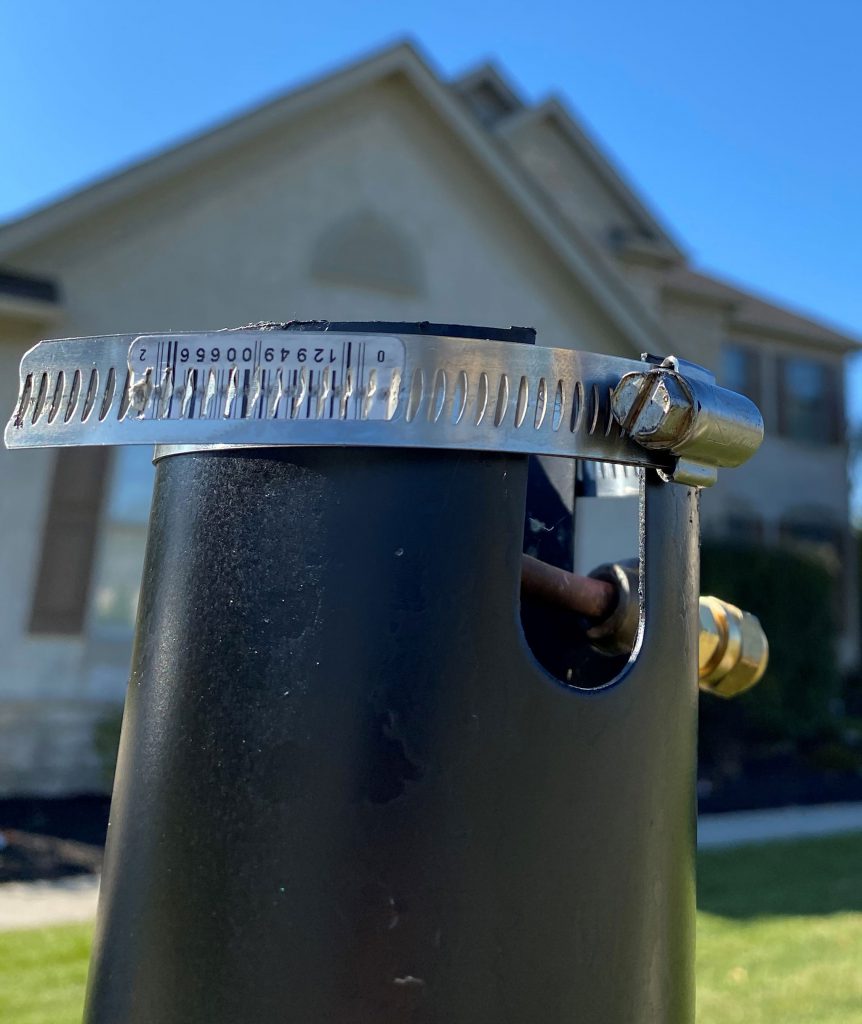
While the post is a simple tube, there are a couple of u-shaped cutouts in the top inch or so of the tube. So at the very top, you really have two semicircles with a 1 inch gap at each side. I thought if I could compress the post a just a little it may make installation easier. I would want to compress the post evenly around the circumference – just whacking it with a hammer would be hard to control the exact amount of “bend” being applied and might make the post out of round.
I happened to have several hose clamps lying around, a couple of which would easily be large enough to go around the top of the post. I thought if I could put a hose clamp on the post near the top, I could tighten the screw and squeeze the post evenly and precisely around it’s circumference– enough to be able to do little bits at a time and hopefully reduce the diameter just enough to make the Imperial III slide to it’s full mounted depth a bit easier. Unlike my old lamp head which only had a single set screw, the Imperial III has three set screws placed evenly around the base, so they would surely provide enough clamping force to hold the lamp in place once assembled on to the post. I installed the hose clamp and tightened the screw until it was snug. Then I turned the screw a couple more times, just to apply a slight clamping force to the top of the post. I then backed the screw out and released it and retried the lamp head install. My thought was that I would repeat this process little bits at a time until the lamp head slid freely but snugly on to the post.
The first trial was a winner. Those couple of screw turns on the clamp deflected the post just enough. It wasn’t loose, but it wasn’t so tight that I feared removal would be impossible. I made sure the lamp was aligned in the direction I wanted it to be and then tightened the three set screws to hold it in place. Note: This lamp fixture is all aluminum – you just need to snug up the set screws firmly. You don’t need to apply all of your strength in an attempt to dent them into the post – you just need to snug them. The post goes a couple of inches up into the base so it’s not going anywhere – overtightened set screws really won’t buy you anything here. As with any hole threaded into aluminum, going too crazy with torque is a surefire way to blow out the threads on the aluminum – so take it easy.
Once the base of the fixture was installed, it was time to turn the lamp head on. Since we are going in to winter I am going to start with the LOW setting on warm Color temperature to provide the most “consistent” look with the gas lamp that once rested in the same place.
Why low? Well – We are having plenty of sunny days right now, but coming in to the winter months, this may not be the case. My earlier test proved that the lamp puts out plenty of light on low, and it buys me extra time if there are some overcast days or if the temperature is cold enough to rob the lithium ion batteries of some performance. I flipped both switches and then slid the top of the fixture on to the base. The top rests on four posts that stick up from the base. To assemble, you put the top on at a slight angle and then twist it about a quarter turn clockwise to lock it into place. It’s a thoughtful design because it makes it really easy to take the top off to clean the inside of the glass on the base, to flip modes using the switches, to clean off the top of the unit that houses the solar panels, or to replace the batteries.
Now, all I had to do was wait for nightfall. I installed this after the daylight savings time cutover in Ohio – so darkness falls around 6pm. Once I hit about 5:30pm I started watching the light. It got pretty dark before it came on – but I think that’s a good thing. If it was really sensitive to light fluctuation, a hefty summer storm in the middle of the day would cause it to turn on. As it is, the level of darkness required should prevent it from coming on in all but the most intense storms and during actual nightfall, while also preventing it from coming on if it happens to be positioned on a shady part of the property that doesn’t receive direct sunlight all day.
The light output is definitely good – even on low. I kept the glass on my gas fixture very clean, and I replaced the mantles frequently enough that the light output was great. Even in the low setting, this unit is only marginally dimmer than the gas unit that it replaced – and in the high setting I think it’s about the same, maybe even a little brighter. When I compare my light (on low) to my neighbors’ gas lights, the light output is similar – but my neighbor’s lamps are all visibly dirty in daylight. Time will tell how well this one performs with dirty glass – I will try to post an update after a few months to share longer term details of my experience with this product.
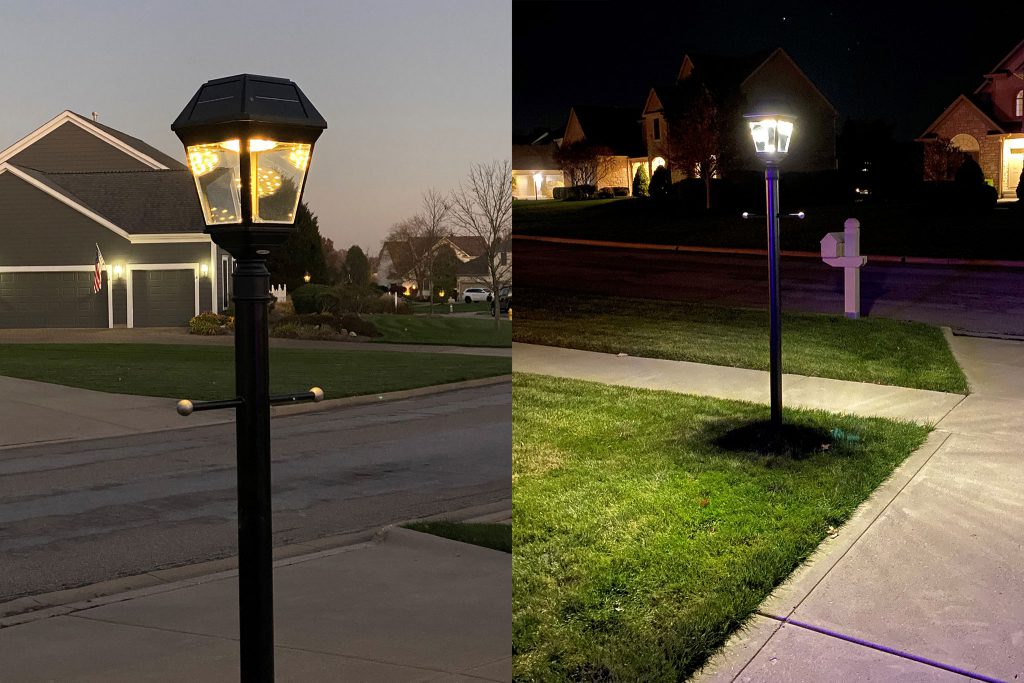
RIGHT: The light about 3 hours later in full darkness.
Conclusion…
For now – I’m saving money long term, I’m not wasting natural gas, and I’m very happy with the way this particular lamp performs and looks. I would happily recommend that anyone tired of messing with the mantles on their gas lamps, tired of their gas lamps burning all day long, or just tired of using a century old technology to light their way upgrade to one of these solar fixtures. They are super easy to install and I don’t think anyone would be disappointed with the result.
Contact…
As I mentioned above, Matt Cohen with Gama Sonic was a great resource as I prepared for the task of replacing this lamp. Not only was he friendly and knowledgeable, he was able to take my order and ship the product to me at a slightly lower price than the full MSRP found in their online store. He has also offered to similarly help any of you in finding and buying the right lights for your purpose. If you are contemplating purchasing solar lighting solutions, I would recommend reaching out to him directly at matt@gamasonic.com or by phone 727-688-5030.